How to use Derived Column Transformation in SSIS

Description:-

Derived Column Transformation in SSIS plays vital role in dealing with expressions in SQL Server Integration Services. The SSIS Expression Language has powerful built-in functions for string manipulation, data type conversions, mathematical functions, conditional expressions and handling Null values.

We can create the required expression using those built-in functions, Columns, Operators and variables. 
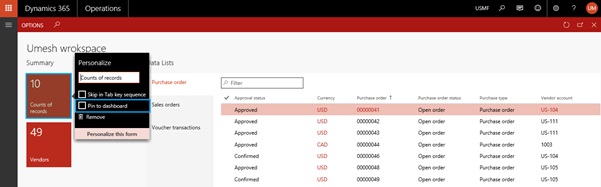
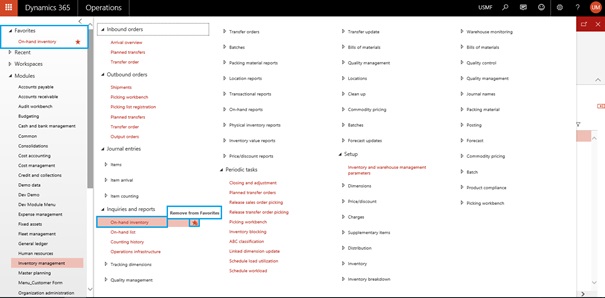
Derived Column Transformation provides an option to choose whether you want to create new columns or replace existing columns with values calculated from expressions.

Drag and drop the data flow task from the toolbox to control flow and rename it as Derived Column Transformation DFT. Double click on it and it will open the data flow tab.

Drag and drop OLE DB Source, Derived Column Transformation and flat file destination from tool box.
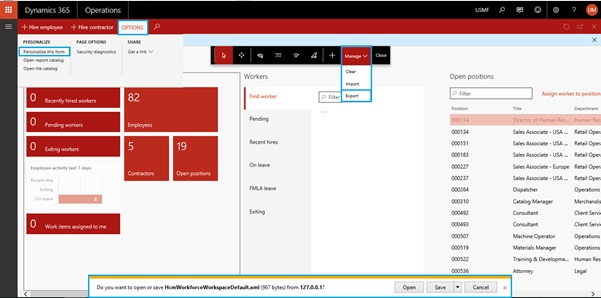
Configure the OLE DB Source with your database connection. I have configure with my database like below.


I am sure you will not face any problem in configuration of source control. Now in next step we have to drag drop Derived column.  Once you drag drop derived column you need to provide output of source assistance to Derived Column Transformation. Now to configure this use context menu by right clicking and choose Edit option you will get below screen. Here we have different functions and operators which we can be utilized with columns and variables and parameters to create derived column.


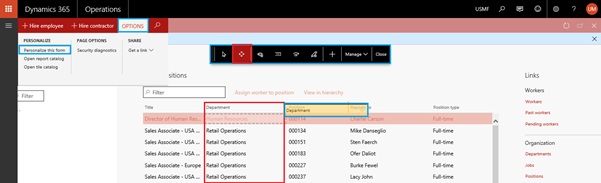
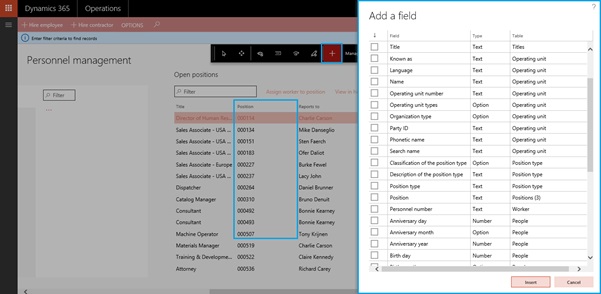
If you see above row in image we can add a new column or can replace any existing column as shown in drop down.

Here I have add 3 (three) new rows for to add new columns in destination. In the first row I have added item name in upper case. Second row I have added configuration for the combination of different columns in single column. In third column I have added mathematical expression.

I hope above steps are pretty much clear. Now add a destination file in which we will get derived column. We have to configure the derived column. As shown in below figure we configured derived column.


Now, once the destination file is configured run the package by pressing F5 or clicking run option. To cross verify the output file.

How to create display method on table extension in D365

How to create display method on table extension in D365

Description:-

This posts helps you to understand and create a "display" method for the table extension.

Let’s say, the requirement is to add a method in the standard table, it can be achieved either by creating a table extension.

So in this scenario we had a requirement to add a display method in the standard table "CustTrans".

In Dynamics 365 we won’t be able to add the new method or modify the existing method to the standard table or to an extension table.

It can be achieved by using the extension class.

Step 1: Create a new class and name it as <Classname>_<Extension>.

<Class-name> - can be any name, but it is preferred to give the table name for which the extension is being created. 

Postfix <_Extension> is must.

Public static class CustTrans_Extension
{ 

}

Step 2: Now add the display methods in the class which is required to be shown.

public static class CustTrans_Extension
{
   [SysClientCacheDataMethodAttribute(true)]
   public static display AgreementId agreementId(CustTrans _this)
   {
      LedgerJournalTrans ledgerJournalTrans;
      
      select ledgerJournalTrans
       where ledgerJournalTrans.TransactionType == LedgerTransType::Payment &&
             LedgerJournalTrans.CustTransId == _this.RecId;

      return ledgerJournalTrans.AgreementId;
   }
}

Step 3: To use this display method in the form.

Create a string control in the form design and set the following properties
Data source: CustTrans
DataMethod: CustTrans_Extension::agreementId
CacheDataMethod: Yes

Step 4: Build/Rebuild the project/solution and check the output in the URL.

How to use Data Conversion in SSIS

Description:-

I am sure by the name it clear that this control will be use when we require data type conversion of input columns then we need this control. This is exactly same like CONVERT or CAST in our programming.

Although, here it would be important to share SSIS also have data type which are similar to other programming or database’s data types Like DT_NUMERIC is equivalent to numeric data type, DT_I2 is equivalent to smallint, DT_str is equivalent to VARCHAR and so on.

The Data Conversion transformation converts the data in an input column to a different data type and then copies it to a new output column. For example, a package can extract data from multiple sources, and then use this transformation to convert columns to the data type required by the destination data store. You can apply multiple conversions to a single input column.


Here in the flat file I have CourseID is numeric, Title is in varchar and Credits is in numeric with decimal 4 points. We want to convert the numeric field in integer and want result in a flat file. So let’s start.

Drag drop a Data flow Task control and double click it. Now add flat file source from SSIS tool bar.

Now next step is to configure this flat file source. So to do this just right click and use EDIT option. You will get a screen where you need to provide the file which we want to access as shown in below figure


If you see on left hand side there is a small menu -> Just click on "Advance" -> a new prompt will open as shown in below image.

Choose CourseID, Title or Credits on the right hand side if you see there is a column called data-type in that it is showing that CourseID, Title or Credits data-type is string-type. i.e. string [DT_STR] as shown below.


Once the file is configured you can choose the columns as well which you want to process or want in destination by click column’s option in as shown in below figure.


In this step we will create a simple Sql database table as our data warehouse with fields like ID, CourseID, Title and Credits.

CREATE TABLE [dbo].[Course](
       [CourseID] [int] NOT NULL,
       [Title] [nvarchar](max) NULL,
       [Credits] [int] NOT NULL
) ON [PRIMARY] TEXTIMAGE_ON [PRIMARY]

GO

To transform data-type according to destination. We need to add up a SSIS component i.e. Data Conversion in between of Source and Destination. So just drag and drop Data Conversion component to the Data Flow tab as shown in below image.


Just right click on Data Conversion -> Go to edit and change the data-types as per destination requirement i.e. Here we will make CourseID and Credits to four byte signed integer[DT_I4] and Title to Unicode string [DT_WSTR] as shown in above image. There are many other SSIS-datatypes you can update as per requirement.

In this step we need to add Destination component and here in this example our destination is SQL Database so for that we will select "OLE DB Destination" component from SSIS toolbox.

Drag and drop "OLE DB Destination" component to Data Flow tab and configure and mapping it with the data source table.


Final step, Save everything once and just click on start or press F5 key to run the process.


If you saw on above image we have ran the process successfully. Let's check our database if data loaded properly or not.

Dynamics 365 for Operations – 15 UI tips and tricks

Description:-

Dynamics 365 for Operations (formerly Dynamics AX) has a fresh and intuitive user interface that can be customised to fit your needs. Here are 15 simple but useful tips to help you make the most of your Dynamics 365 user experience.

Contents

1  - Add custom dashboard banner
2  - Personalise default dashboard
3  - Pin tile to default dashboard
4  - Pin list, project, etc. to default dashboard
5  - Pin NavPane and ActionPane
6  - Save favourites for quick access
7  - Default dashboard options: Essentials dashboard
8  - Personalisation bar – Manage function
9  - Personalise grids
10 - Mouse over links for pop-up info boxes
11 - Peek behind a dialogue/slider
12 - Work in several windows at the same time
13 - Use the Action search bar
14 - Fast Tabs
15 - Fact Boxes

1 - Add custom dashboard banner

Organization administration > Organizations > Legal entities > Dashboard image:


Now click on EDIT button and change Dashboard company image type “banner”, after that click on change and upload you image. Please note that optimal resolution for a banner image is 1920 x 281 pixels and optimal width for a logo image is 350 pixels.


Now refresh the operation and you will see a new banner on your D365.


2 - Personalise default dashboard
  1. Right-click on any Workspace.
  2. Click Personalise.
  3. Click Personalise this form.
  4. Use Personalisation bar to drag and drop or hide Workspaces.

3 - Pin tile to default dashboard
  1. Open desired Workspace.
  2. Right-click on a tile.
  3. Select Pin to dashboard.
 

Now back to all workspace. Your workspace look like below image.


4 - Pin list, project, etc. to default dashboard

Filter list as necessary or open a project. Select OPTIONS > Add to workspace. Click Configure. Enter name for tile. Deselect count on tile if not necessary. Return to Workspace and refresh.

 
Now go to workspace and it will look like below image.


5 - Pin NavPane and ActionPane

ActionPane pin


NavPane pin


6 - Save favourites for quick access

Click star to save as favourite


7 - Default dashboard options: Essentials dashboard
  1. Click main settings icon.
  2. Click User Options.
  3. Click Preferences.
  4. Select Initial page > Essentials dashboard.


8 - Personalisation bar – Manage function
  1. Choose OPTIONS > Personalise this form
  2. Click Manage
  3. Export all your personalisation into an XML file or Import a file
  4. Clear and refresh will reset Workspace to default state, apart from grids


9 - Personalise grids
  • Choose OPTIONS > Personalise this form
  • Select Move or Hide function
 
  • Click on column header to hide column

  • Click on Add function
  • Click on any column header (or filter) to bring up list of fields (or filters) to add


10 - Mouse over links for pop-up info boxes

Throughout the UI there are helpful pop-up info boxes available by hovering the cursor over links.


11 - Peek behind a dialogue/slider

Click CTRL+ mouse left click and hold outside the slider to see behind.


12 - Work in several windows at the same time

To work in more than one window simultaneously, use the window pop-out icon. The original page will reload the previous page.


After click look like below image.


13 - Use the Action search bar

For quick access to Actions, use the Action search bar ( hot key: Alt + Q or Ctrl + ‘ ). Start typing the name of the desired Action and select in list.


14 - Fast Tabs

Data in Fast Tabs is not loaded until the tabs are expanded. If not used often, leave in collapsed state as it may improve performance.


15 - Fact Boxes

Data in Fact Boxes is not loaded until the sections are expanded. If not used often, leave in collapsed state as it may improve performance.

Operations Data export using data entities in D365

Description:-

The Data Management Framework of Dynamics 365 For Finance and Operations – Enterprise Edition provides advanced data management capabilities, which makes the overall data export and import really seamless easy, for both standard Dynamics 365 data entities, as well as any custom entities that you might have developed for your business requirements. This framework provides an easy to use front end interface for data export and import management, so that regular pro-users of Dynamics 365 can interact with it, without requiring advanced knowledge of development and database.

The purpose of this document is to demonstrate how we can export data using data entities in Dynamics 365 for Operations.

Prerequisites:
·         Access to Dynamics 365 for Operations instance via remote desktop.
·         To be provisioned as an administrator for the instance.

Requirement:
Ability to export/migrate legacy business data to Dynamics 365 for Operations.

Process:

Navigate to Workspaces > Data management > Export.
Enter job details as shown below. We have selected a custom data entity Customer Groups in this scenario. You can safely use any standard data entity instead.

Here I have selected target data format to CSV you can select which format data you want for export.
Then after click on add on Add entity button to add the process group for customer group export.
Click View map to generate field mappings. On Map source to staging screen, click Mapping visualization. Define the mapping. Click Save.
Also you can see mapping details by clicking on mapping details tab.
Now select the process group and click on the export button from the action pane like below.
After clicked the message popup for your data job has been successfully scheduled. Click on the close button to close the message popup windows.
At the end of the execution, you should see the Execution summary.
Refresh the whole page to see how many records has been exported.
Click on the view execution log button form action pane to see the execution log.
Now the process group and click on … and select Download file to download the customer groups in the CSV format.
Now save the file and open the csv file. You can verify the data loaded by navigating to the relevant form. In this case Customer groups details master form.