
Description:-
Various versions of the Data
Import/Export Framework are available. The version that you use depends on the
version of Microsoft Dynamics AX that you run in your environment:
- For Microsoft Dynamics AX 2012 R3, use the version of the Data Import/Export Framework that is included in that release.
- For Microsoft Dynamics AX 2012 R2, use the version of the Data Import/Export Framework that is available in cumulative update 7 for Microsoft Dynamics AX 2012 R2.
- For AX 2012 or Microsoft Dynamics AX 2012 Feature Pack, use the version of the Data Import/Export Framework that is available from the Lifecycle Services Downloadable Tools (formerly on InformationSource).
Step 1: Create Table Name it “A_PurchaseOrder”.
- Expand AOT Node.
- Open Data Dictionary Node.
- Select Table Node.
- Right Click in table Node Select New table.


Insert Fields like Purchase_ID (String), Vender_Code (String), and Vendor_Code
(Date) in ExtendedDataType Property select BaseDate, Status (Enum) in EnumType
Select PO_Status Enum (Create in Step-2) and Purchase_Amount (Integer).
Step 2: Create BaseEnum Name it “PO_Status”.
- Expand AOT Node.
- Open Data Dictionary Node.

- Select Base Enums right Click and Select New base Enum.
- Now Select Created New Enums right click and
Select New Element Name it “Open”.

- Add New Element and Name it “Close”.
Step 3: Create Form Name it “ImportExportCsv”.
- Expand AOT Node.
- Select Form Node right click Select New Form and Name it ‘ImportExportCsv.
- Drag and Drop Created table in Form DataSource.
- Design Proper in Design Node.
- Create Two Button for Import/Export Data.
- Create Search Purpose StringEdit Control and two Button for Search Button and Clear Value.
- Create Grid for Data Storing So User Can See.
- Now Drag and Drop DataSource Fields in Created Grid Control.

Step 4: Now Generate Import/Export functionality We Will Create
Class to check weather data is there or not. For import Data We Have to Check
Data is Newer or Existing. So Create Class Name it “CSVData”.
- Expand AOT Node.
- Select Classes Node Right Click and Select New Class and Name it “CSVData”.

- Now Create New Method and Name it “CheckPID”.
- For Creating New Method in Class Select New to Create New Method.

- Now Created CheckPID Method Change Return type to Boolean.
- And Code for Checking Data in Table.
 Step 5: Now Create another Method and Name it “main”.
- Check Return Type Should Void.

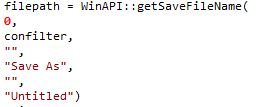
- Create TextIO for Creating Text, Csv, and Doc File.
- I Had Created Container for Save File in Csv, Text, and Doc.
- Check Complete Code and See How I Created TextIO.
- Here I Had used different Controls to Understand How to Use, Enum in TextIO, Integer, Strings, and Date etc.
Step 6: Now Open Previously Created
Form and Open Design Node.
· Generate Import button Click event.
 1. Expand
Import Button.
1. Expand
Import Button.
2. Select
Method Node right Click Mouse over Override Method and Select Clicked Method.
·
Now Code in generated Clicked Method for Import Csv
Data in table.


Step 7: In Import
Button We Will Create File Dialog to Select File for Importing in Table.

Step 8: Here we
are changing permission to Read Mode, Write Mode, Or Both.

Step 9: In Csv
File if Delimiter Found Then we Have to Remove it So Here we Used
FiledDelimiter.
Step 10: Now
Check for Csv File or Lines in That File and pick First Column Value.

Step 11: Here
Tacking Value We Will use Conpeek.
Step 12: Now we
Will Check Taken PID is already in Table or its New for that we Already Created
Method in CSVData Class CheckPID.
Step 13: Now we
Will Check for Data is Exist or What for that we have to have to Call CheckPID
method from Class if Data Exist then Update or not then insert in table and
Give info for how many record Inserted and Updated.

Step 14: Now Open
Generate StringEdit Modified Event to Code for Searching in Table.


Step 15: Here I
have Used Searching data from table so Value Found in StringEdit Control it
means StringEdit modified Then Directly Check from Table.
Step 16: for
searching in Table like Value could be String, Enums, Date, Integer etc. so I
have used Criteria for Searching Value.

Step 17: so Criteria will occurs and if value found in table then Check for Data in Table through while loop so we can easily check one by one row in table.

Step 18: Here I
have Used Date Format in range which separated by DateSeparator like.
Step 19: After it
will Check the Combo box Value is Yes or No. if Yes Found Then Create Csv Otherwise
Not. So here we are Checking Value if yes then create otherwise not. So directly
it will not create Csv file When Search finished here we are maintaining value.
And After Searching by Clicking on Export Button Create Csv File.

Step 20: If Value
Not found from table then Clear Range and executeQuery Method Occurs in
DataSource.

Step 21: Now
Generate Export Button Click Event (Refers
Step-6) for Export Data in Csv File in this Event we Will Maintain Value if
StringEdit is Null then Export All Data otherwise based on value export Data.

Step 22: After
that Generate Search Button Click event
so by clicking on We Can Generate Data Based on Searching Controls.to Generate Click event refers Step- 6.
And Code for Search Value in table. Here we check if Value is blank in
Searching Control then we will give Info Message Otherwise if Value found then
call the StringEdit Modified Method.

Step 23: for
clearing value in StringEdit Control Generate Clear Button Click event. To
Generate Click event (refers Step-6).Here
we check if Value in StringEdit Control that it will clear otherwise not.
Step 24: Don’t
forgot it Check Grid Control DataSource Property Should Must be DataSource
Name.

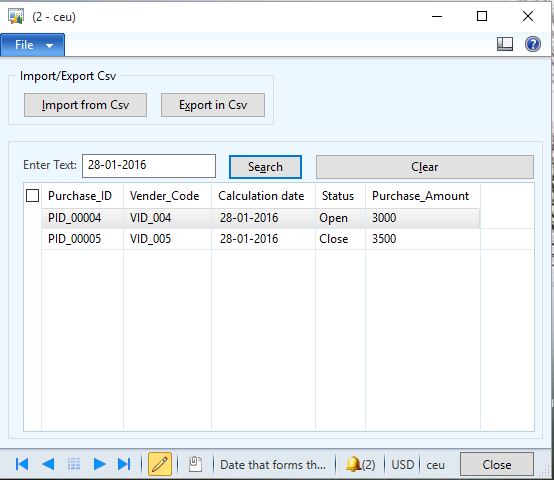
Step 25: Now open
your form Click on Export button to Generate Csv File.

Step 26: Now One
File Dialog Will Open Enter File Name and Save and Select extension in which
format you have to save File.

Step 27: Now
Click on Search Edit Control and Enter Value to Search and Click Search Button.
Step 28: Now
Click on Export Csv Button to Generate Csv File and Enter File Name and Click
on Save Button.

Step 29: Now modified you
Data in Csv File. For Modified right click your Newly Created Csv File Click
Edit So File open in Edit Mode.

Step 30: Now
Enter New Entry in Text File and Save it.

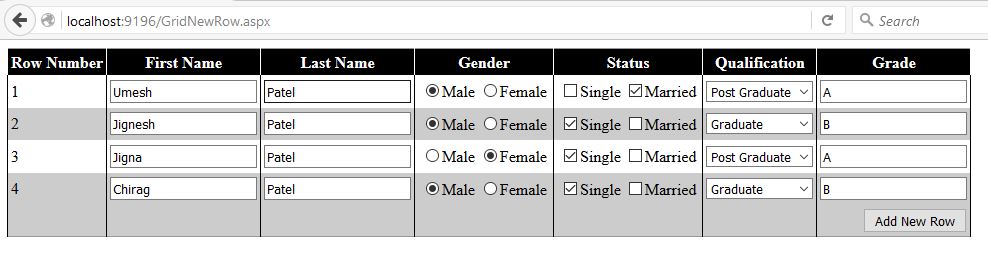
Step 31: Now
double Click on Modified Csv File so you can see your Edited Data in Csv File.
File Open in Browser.

Step 32: Now
Click on Import button to Create Data in Table which one we Added in Csv File.

Step 33: After
File Dialog Will Open for selecting File.

Step 34: Now
Click on Folder to open you Modified Csv File and Click Open Button to Open in
File FileDialog Form.
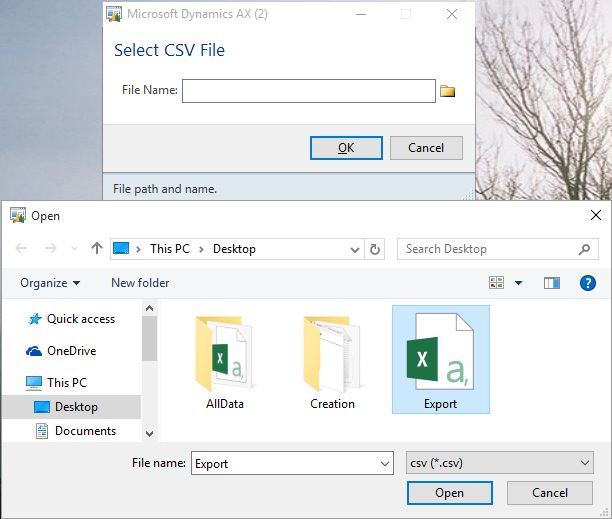
Step 35: Now you
can See Your File will be selected in File Dialog Form.

Step 36: Now
Click on OK Button to Import Csv File Data in table. Here you Can See Info Log
will open with How Many Data Inserted and how many data updated in table.

Step 37: Now you
can see in your form Inserted Data Which we modified in Csv File it inserted in
Table.

Step 38: Now
Without Entering Value Click on Search Button to See Infolog with Information.

Step 38: When you
Have Entered Value in StringEdit Control if you Want to Clear Value Then Click
Clear Button to Clear that Value from StringEdit Controls.
