Showing posts with label D365. Show all posts

Form and Table Customization in D365

Description:-

Customization of any particular form or table is done by creating extensions. Any modifications or to add some fields to an original object can be done by creating extensions. At run time all these extensions run as single object.
In this blog we demonstrate how to add fields to an existing form.Consider the form CustTable and add two fields in the form.
  • Passport Number
  • Age
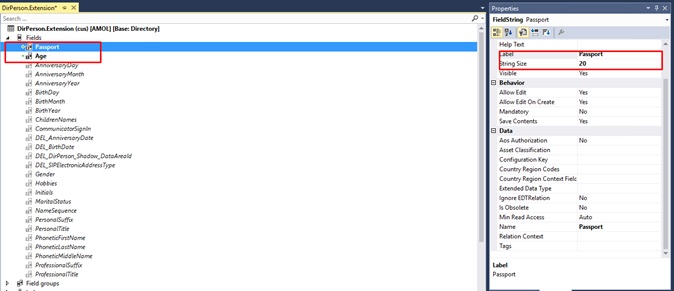
Step 1:-From Application explorer open DirPerson Table –> right click and click on create extension.


Step 2:- Open the table designer and expand the fields. Add the two fields and set the appropriate properties.


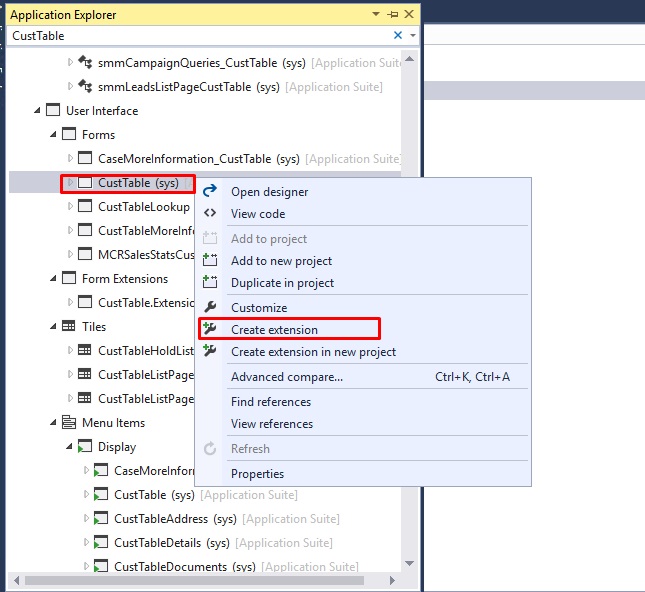
Step 3:- From Application explorer open CustTable Form –>right click and click on create extension.


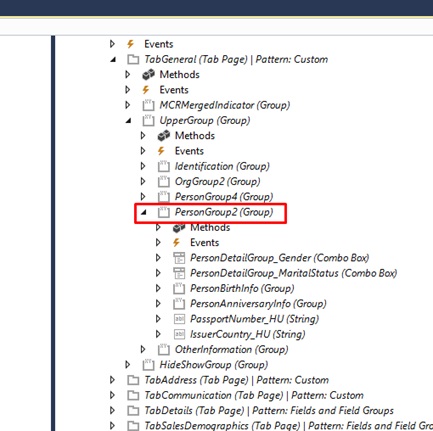
Step 4:- Open the form designer of CustTable. Expand the deign portion until you reach the control, where you want to add required field. for example I want to add New fields in Person Detail section.


Step 5:- Open the data sourceà go to fields and drag and drop the newly created field.Save the changes and build the project.


Step 6: This adds the fields to the form.

"DISPLAY" method on table extension in D365

Description:-

This posts helps you to understand and create a "display" method for the table extension.

Let’s say, the requirement is to add a method in the standard table, it can be achieved either by creating a table extension.

So in this scenario we had a requirement to add a display method in the standard table "PurchTable".

In Dynamics 365 we won’t be able to add the new method or modify the existing method to the standard table or to an extension table.

It can be achieved by using the extension class.


Step 1: Create a new class and name it as <Classname>_<Extension>.

<Class-name> - can be any name, but it is preferred to give the table name for which the extension is being created. 

postfix <_Extension> is must.

public static class Purchtable_Extension
{
}

Step 2 : Now add the display methods in the class which is required to be shown.

public static class Purchtable_Extension
{
    [SysClientCacheDataMethodAttribute(true)]
    public static display Name VendName(Purchtable _this)
    {
        DirPartyTable DirPartyTable;
        VendTable VendTable;

        select * from VendTable
            join DirPartyTable where DirPartyTable.RecId == VendTable.Party
            && VendTable.AccountNum == _this.OrderAccount;

        return DirPartyTable.NameAlias;
    }
}


Step 3: To use this display method in the form.
Create a string control in the form design and set the following properties

Data source: PurchTable
DataMethod: PurchTable_Extension::agreementId
CacheDataMethod: Yes

Below is the screen shot for reference.


Step 4: Build/Rebuild the project/solution and check the output in the URL.

Event handlers usage through code in D365

Event handlers usage through code in D365

Description:-

Here are some of basic use of EVENTS handlers of the Form with respective syntax for logic.

Form datasource from xFormRun

[FormEventHandler(formStr(SomeForm), FormEventType::Initialized)]
public static void SomeForm_OnInitialized(xFormRun sender, FormEventArgs e)
{
FormDataSource MyRandomTable_ds = sender.dataSource(formDataSourceStr(SomeForm, MyRandomTableDS));
...
}

Get FormRun from form datasource

[FormDataSourceEventHandler(formDataSourceStr(MyForm, MyRandomTableDS), FormDataSourceEventType::Written)]
public static void MyRandomTableDS_OnWritten(FormDataSource sender, FormDataSourceEventArgs e)
{
FormRun formRun = sender.formRun() as FormRun;
formRun.myCustomMethod();
}

Get FormRun from form control

[FormControlEventHandler(formControlStr(MyForm, MyButton), FormControlEventType::Clicked)]
public static void MyButton_OnClicked(FormControl sender, FormControlEventArgs e)
{
FormRun formRun = sender.formRun() as FormRun;
formRun.myCustomMethod();
}

Access form control from xFormRun

[FormEventHandler(formStr(SomeForm), FormEventType::Initialized)]
public static void SomeForm_OnInitialized(xFormRun sender, FormEventArgs e)
{
sender.design().controlName(formControlStr(SomeForm, MyControl)).visible(false);
}

Get current record in form control event

[FormControlEventHandler(formControlStr(SomeForm, SomeButton), FormControlEventType::Clicked)]
public static void SomeButton_OnClicked(FormControl sender, FormControlEventArgs e)
{
SomeTable callerRec = sender.formRun().dataSource(1).cursor();
}
Source code location in Dynamics D365 For Operations

Source code location in Dynamics D365 For Operations

Description:-

The application code for Dynamics 365 for operations is stored in File system, usually in a directory named PackageDirectory. You can find the details on the configuration related to AOS in a web.config file.

Steps to follow: 
  1. Open IIS and go to the Sites\AOSService (in case you missed, AOS is a web service with D365Ops).
  2. Right click > Explore
  3. You should be directed to a folder (to J:\AosService\WebRoot if you are using MS demo environments)
  4. Now search for the web.config file and open it.
  5. Search for keyword - "Aos.PackageDirectory" and you should be able to find the value for the Package directory.
  6. It should be J:\AosService\PackagesLocalDirectory (if you are using MS demo environments)
How is the Source code updated in File system: 

Now if we try to look into how the code is stored in the File system. In the above identified PackageDirectory, you will find that there are individual folders to consist the code changes for each Model. 

The simplest way to understand the structure is to create your own model and verify the below: 
  1. Look for the folder relevant to your newly created model (in my case, AJDEV)
  2. Under path //PackageLocalDirectory/AJDEV/AJDEV - you will observe that there are #78 new folders created for each element type in the AOT. All with a sub folder Delta which is going to store the changes made.
  3. And under path //PackageLocalDirectory/AJDEV/Descriptor - you will find a config file storing the information about your model.
  4. And under path //PackageLocalDirectory/AJDEV/XPPMetadata - the metadata information about the AOT objects is stored.
Code for Excel importing in D365

Code for Excel importing in D365

Description:-

Now Dynamics AX 365 is running on Web browser so import the data in AX using Excel, CSV, text etc. has been changed. FileName, FilenameOpen extended data type is no more supported to browse the excel file.

If we compare Excel file import process between AX 2012 and Dynamics AX 365 then in AX 2012 file was importing from Client (from local system) to AX database directly but now the new AX is running on web server over the IIS so to import file in AX mean first file need to import on server and need to store in File server or SharePoint or Database. And then read the file from stored location may be from File server, SharePoint or Database.

So how we can import data in AX using Excel file? The simple way is via using Data entities and if data entity does not exist then need to create new Data entity for table and then we can import data via using the excel file or any other supported file using that Data entity.

But sometime required to import the data in AX using dialog in that case Data entities will not help, so in this blog I will describe how we can import data in Dynamics AX 365 using excel file.

In ax 2012 we have used the below classes to import data in AX via using excel file:-

SysExcelApplication application;
SysExcelWorkbooks workbooks;
SysExcelWorkbook workbook;
SysExcelWorksheets worksheets;
SysExcelWorksheet worksheet;
SysExcelCells cells;

But now in Dynamics AX 365 the above classes does not exist anymore to read excel file.
So how we can import data in AX via Excel file?,
So first step to import the excel file in AX , create a new class (TestExcelImport) and extend with RunBase and add a new button in dialog with upload caption (Same as AX 2012).

Object Dialog()
   {
       FormBuildButtonControl buttonControl;
       DialogGroup            dlgGroup;
       FormBuildGroupControl  buttonGroup;
       dialog = super();              
       dlgGroup       = dialog.addGroup('');
       buttonGroup    = dialog.formBuildDesign().control(dlgGroup.formBuildGroup().id());
       buttonControl  = buttonGroup.addControl(FormControlType::Button, 'Upload');
       buttonControl.text("Upload file");
       buttonControl.registerOverrideMethod(methodStr(FormButtonControl, clicked),
                                        methodStr(TestExcelImport, uploadClickedEvent),
                                        this);
       return dialog;
   }

And below is the upload button click event (click event already registered in above dialog method)

private void uploadClickedEvent(FormButtonControl _formButtonControl)
   {
       FileUploadTemporaryStorageResult result = File::GetFileFromUser() as FileUploadTemporaryStorageResult;
       If (result && result.getUploadStatus())
       {
           result.getFileContentType();
           //result.
           fileUrl = result.getDownloadUrl();
           info(fileUrl);
       }
   }

FileUploadTemporaryStorageResult is the class has been introduced in AX and this class is responsible to browse and upload the file on server (On File server, SharePoint or Database). And from here store the file path (for me fileUrl) in a variable to read the file later in run method.

Now next step to read the data from uploaded excel file:-

Public  void   run()
   {
       System.Byte[] byteArray;
       System.IO.Stream     stream;
       try
       {
           stream = File::UseFileFromURL(fileUrl);
           this. readExcelData(stream);
           //info("Done"); 
       }
       catch(Exception::Error)
       {
           info(strFmt("%1 %2",Exception::Error,fileUrl));
       }
   }

File class has been used to read excel data from the url (file location from server) and will return the data in stream. Now the task is to read excel Stream data in AX.So to read stream data of excel file Microsoft have used ExcelPackage (EPPlus ),we can manipulate the file using this package (Create excel,create new worksheet , pivot table , design ,formatting etc.). Developer can access the classes of  EPPlus using OfficeOpenXml namespace. the below classes is responsible to read the data from stream.

OfficeOpenXml.ExcelWorksheet;
OfficeOpenXml.ExcelPackage;

ExcelPackage class is responsible to create  excel package from stream (can be file also in place of Stream), ExcelWorksheet class where the worksheet has been copied with data. And then looping the data of rows from the excel cells.

conData container variable declared in class declaration of class. So now enjoy the excel import in AX.

Note:- Import the data via using CSV or text file still easy and we can use CommaIo or Comma7Io.

Adding display method in form in D365

Adding display method in form in D365

Description:-

Today we will be looking at how we can add display method on forms.Let’s say I would like to add a new display method on CustTable form.

In Dynamics 365 we won’t be able to add the new method or modify the existing method to the standard table or to an extension table.

It can be achieved by using the extension class.

Step 1: Create a new class and name it as <Classname>_<Extension>.

public static class CustTable_Extension
{

}

Step 2 : Now add the display methods in the class which is required to be shown.

public static class CustTable_Extension
{
    [SysClientCacheDataMethodAttribute(true)] //This attribute will cache your display method.
    public static display Name customerGroupName(CustTable _this)
    {
        return CustGroup::find(_this.CustGroup).Name;
    }
 }

To use your display method on the form, create your new field on the form extension and use the property as below:

Data source: CustTable
DataMethod: CustTable_Extension::Name

To cache your display method on the form set on the field the property "Cache Data Method" = yes.

CacheDataMethod: Yes

**Things to remember**
  • The class must be postfixed with “_extension”.
  • The class must be static.
  • The extension methods must be static.
  • The type of the first parameter determines which type is extended.