Create Custom lookup in AX 2012

Description:- 
Lookup is nothing but we can see easily other table data in other form or table. When we have to fill Marks data based on student Name or Student ID then we are storing Only ID Field in Column that time we have to See ID and Name in Lookup it Means Dropdown. So We Can Easily Select and Filled Data in Controls. Custom Lookup is nothing but codding through We Can Generate Lookup it Means Dropdown in Form.


Step 1: Create Table Name it “A_Student”.
  1. Expand AOT Node.
  2. Open Data Dictionary Node.
  3. Select Tables and right Click Select New Table.
  4. Name it “A_Student”.
  5. Now open table in Insert Some Data in A_Student table.

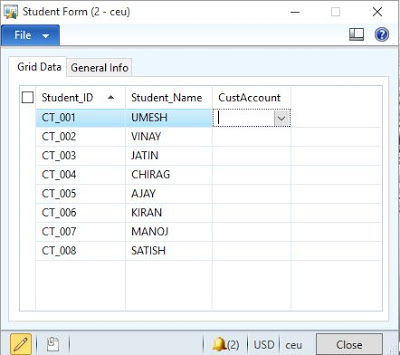
Step 2: Now Create Form and Name it “A_StudentForm”.
  1. Expand AOT Node.
  2. Select Form Node and Right Click Select New Form and Name it “A_ StudentForm”.
  3. Now Drag and Drop Table in Form DataSource.
  4. Select Design Node Right Click and Select NewControls & Add Grid Controls in Design Node. 

Step 3: Drag and drop DataSource Field in Grid Controls to See Data in Form. 


Step 4: Now select Cust_Account Field form Grid Controls and Override Lookup Method.


Step 5: Create Custom Code for Lookup and Create Query, QueryBuildDataSource, and QueryBuildRange and Perform Lookup in A_StudentForm.

Lookup Code:

public void lookup()
{
    Query                   query = new Query ();
    QueryBuildDataSource    qbds;
    QueryBuildDataSource    qbdsJoin;
    SysTableLookup          sysTableLookup = sysTableLookup::newParameters(tableNum(CustTable), this);
    ;
 
    qbds= query.addDataSource( tableNum(CustTable));
    sysTableLookup.parmQuery(query);
    sysTableLookup.addLookupfield( fieldNum(CustTable, AccountNum), true);
    sysTableLookup.addLookupfield( fieldNum(CustTable, Party));
    sysTableLookup.performFormLookup();
}

Step 6: Now Open A_Student Form to Open Right Click on Form and Select Open. 


Step 7: Now Select CustAccount Column to Open Custom Lookup.
How to Filter the record using Alphabets pager in asp.net

How to Filter the record using Alphabets pager in asp.net

Description:-

In this tutorial I am going to explain how to filter the record using Alphabets pager in asp.net.
To implement this functionality I am using datalist control (alphabets pager) and gridview control (to show the record).I have created table Tb_Movie and dummy data.

Id
int
Name
varchar(50)
Genre
varchar(50)
Budget
int

Create a store-procedure to get data from database:-

CREATE PROCEDURE Sp_FilterRecord
            (
            @filter varchar(100)
            )
AS
BEGIN
            SET NOCOUNT ON;
            If @filter='all'
            begin
Select * from Tb_Movie
end
else begin
Select * from Tb_Movie where Name like @filter + '%'
end
END
GO

Html:-

<html xmlns="http://www.w3.org/1999/xhtml">
   <head runat="server">
      <style>
         .linkbtn
         {
         padding:5px;
         background:#000;
         color:#fff;
         text-decoration:none;
         border: 2px solid #2196F3;
         }
      </style>
   </head>
   <body>
      <form id="form1" runat="server">
         <div>
            <asp:ScriptManager ID="ScriptManager1" runat="server"></asp:ScriptManager>
            <asp:UpdatePanel ID="UpdatePanel1" runat="server" UpdateMode="Conditional">
               <ContentTemplate>
                  <asp:DataList ID="dtlalphabets" runat="server" RepeatDirection="Horizontal">
                     <ItemTemplate>
                        <asp:LinkButton ID="LinkButton1" CssClass="linkbtn" runat="server" Text='<%#Eval("Value")%>'>LinkButton</asp:LinkButton>
                     </ItemTemplate>
                  </asp:DataList>
                  <asp:HiddenField ID="HiddenField1" runat="server" />
                  <br />
                  <asp:GridView ID="GridView1" Width="50%" runat="server" ShowHeaderWhenEmpty="True" AutoGenerateColumns="False" CellPadding="4" ForeColor="#333333" GridLines="None" AllowPaging="true" PageSize="2" OnPageIndexChanging="GridView1_PageIndexChanging">
                     <EmptyDataRowStyle ForeColor="red" Font-Bold="true"/>
                     <AlternatingRowStyle BackColor="White" ForeColor="#284775" />
                     <Columns>
                        <asp:BoundField DataField="Name" HeaderText="Name" ItemStyle-HorizontalAlign="Center"/>
                        <asp:BoundField DataField="Genre" HeaderText="Genre" ItemStyle-HorizontalAlign="Center"/>
                        <asp:BoundField DataField="Budget" HeaderText="Budget (In Crore)" ItemStyle-HorizontalAlign="Center"/>
                     </Columns>
                     <EditRowStyle BackColor="#999999" />
                     <EmptyDataTemplate>No Record Exist</EmptyDataTemplate>
                     <FooterStyle BackColor="#5D7B9D" Font-Bold="True" ForeColor="White" />
                     <HeaderStyle BackColor="#5D7B9D" Font-Bold="True" ForeColor="White" />
                     <PagerStyle BackColor="#284775" ForeColor="White" HorizontalAlign="Center" />
                     <RowStyle BackColor="#F7F6F3" ForeColor="#333333" />
                     <SelectedRowStyle BackColor="#E2DED6" Font-Bold="True" ForeColor="#333333" />
                     <SortedAscendingCellStyle BackColor="#E9E7E2" />
                     <SortedAscendingHeaderStyle BackColor="#506C8C" />
                     <SortedDescendingCellStyle BackColor="#FFFDF8" />
                     <SortedDescendingHeaderStyle BackColor="#6F8DAE" />
                  </asp:GridView>
               </ContentTemplate>
            </asp:UpdatePanel>
         </div>
      </form>
   </body>
</html>

Import the namespace:-

using System.Data;
using System.Data.SqlClient;
using System.Configuration;

Create sqlconnection:-

SqlConnection con = new SqlConnection(ConfigurationManager.ConnectionStrings["con"].ToString());

Page load event of page:-

protected void Page_Load(object sender, EventArgs e)
{
    if (!IsPostBack)
    {
        ViewState["CurrentAlphabet"] = "ALL";
        GenerateAlphabetsAtoZ();
        BindGrid();
    }
}

Generate alphabets A to Z:-

Write a method to generate alphabets and bind to datalist.

private void GenerateAlphabetsAtoZ()
{
    try
    {
        List<ListItem> alphabets = new List<ListItem>();
        ListItem alphabet = new ListItem();
        alphabet.Value = "ALL";
        alphabet.Selected = alphabet.Value.Equals(ViewState["CurrentAlphabet"]);
        alphabets.Add(alphabet);
        for (int i = 65; i <= (65+25); i++)
        {
            alphabet = new ListItem();
            alphabet.Value = Char.ConvertFromUtf32(i);
            alphabets.Add(alphabet);
        }
        dtlalphabets.DataSource = alphabets;
        dtlalphabets.DataBind();
    }
    catch (Exception ex)
    { }
}

Bind Gridview:-

Write another method to bind the gridview.

public void BindGrid()
{
    SqlCommand cmd = new SqlCommand("Sp_FilterRecord", con);
    cmd.CommandType = CommandType.StoredProcedure;
    con.Open();
    cmd.Parameters.AddWithValue("@filter", ViewState["CurrentAlphabet"]);
    SqlDataAdapter adp = new SqlDataAdapter(cmd);
    DataTable dt = new DataTable();
    adp.Fill(dt);
    if (dt.Rows.Count > 0)
    {
        GridView1.DataSource = dt;
        GridView1.DataBind();
    }
    else
    {
        DataTable dtnew = new DataTable();
        GridView1.DataSource =dtnew;
        GridView1.DataBind();
    }
}

Event for linkbutton:-

Write the below given code for linkbutton which is placed in Datalist control.

protected void LinkButton1_Click(object sender, EventArgs e)
{
    LinkButton lnkAlphabet = (LinkButton)sender;
    ViewState["CurrentAlphabet"] = lnkAlphabet.Text;
    this.GenerateAlphabetsAtoZ();
    GridView1.PageIndex = 0;
    this.BindGrid();
}

protected void GridView1_PageIndexChanging(object sender, GridViewPageEventArgs e)
{
    GridView1.PageIndex = e.NewPageIndex;
    BindGrid();
}

Finally write the below code on PageIndex event of gridview. 

protected void GridView1_PageIndexChanging(object sender, GridViewPageEventArgs e)
{
     GridView1.PageIndex = e.NewPageIndex;
     BindGrid();
}

Pick and unpick Item in Picking list while salesorder pickinglist journal posting in ax 2012

Description:-

In this article we will see about how to select item and it’s configuration through code and directly update invent quantity. Here I have create form where you can select items through code and directly update it in inventory while sales order picking list posting. 
First create sales order and add multiple or single item in lines. After confirm sales order and create picking list.

From line tabe Select Pick from Updateline Selection. after you can select item or add item’s based on configuration, site and warehouse.  Here I have add button for picking item from Posted Report as Finished journal from Production order, so you can select directly from Production order how many quantity create form Which identification number or else which order. 

In Pick from you can see issue status, sales order number, item number and its configuration, site and warehouse and from which serial number item quantity pick form RAF (Report as Finished) journal. That selected item will be picked and update in inventory transaction like below image. 

Now code on your created button for open new form and in DataSource init select items and serial number from RAF posted Journal. After selecting multiple records update inventory through given code.

//pick or unpick
inventTransQuery = new Query();
QueryBuildDataSource = inventTransQuery.addDataSource(tableNum(InventTrans));
InventTrans = InventTrans::findTransId(conInventTransId);
InventTransOrigin = InventTransorigin::findByInventTransId(conInventTransId);
QueryBuildDataSource.addRange(fieldNum(InventTrans,RecId)).value(int642str(InventTrans.recid));

delete_from tmpInventTransWMS;
tmpInventTransWMS.clear();
inventTransWMS_Pick = InventTransWMS_Pick::newStandard(tmpInventTransWMS,inventTransQuery);
tmpInventTransWMS.initFromInventTrans(InventTrans);
tmpInventTransWMS.initFromInventTransOrigin(InventTransOrigin);
tmpInventTransWMS.InventQty = -1 * conVariantQty; //minus qty untuk unpick, plus qty untuk pick
tmpInventTransWMS.InventDimId = _inventDimX.InventDimId;
inventTransWMS_Pick.writeTmpInventTransWMS(tmpInventTransWMS);
inventTransWMS_Pick.updateInvent();
//end pick or unpick

Enable or Disable Column in SSRS Report in Ax 2012

Enable or Disable Column in SSRS Report in Ax 2012

Description:-
 
Here we will see about how to enable/disable column visibility in ssrs report. Here I have given sample demonstration to enable/disable column visibility in ssrs report.

For example:-
In your table contain one Boolean fields and you have set Boolean parameter for enable/disable column, so based on that parameter and fields value you can enable/disable column visibility in ssrs report.
While inserting data into your table you have set Boolean fields value by default “No”
You have to set Column visibility Expression on SSRS Report like below.
=IIF(TableFields = ParameterField,True,False)
Select the column which one you have to Enable/Disable in SSRS Report and set the Expression.

How to play youtube video using modelpopup xxtender in Asp.net


Description:-

In this article we will Play YouTube video using ModelPopupExtender in dot net. Here we will Create Textbox, Button Control for Open YouTube Video in Model Popup Extender by Given Textbox Url for YouTube Video. follow this step to create it.

Design your Webpage like below.

<div>
   <cc1:ToolkitScriptManager ID="ToolkitScriptManager1" runat="server">
   </cc1:ToolkitScriptManager>
   <asp:TextBox ID="txtUrl" runat="server" Width="300" Text="https://www.youtube.com/watch?v=cWuvnc6u93A" />
   <asp:Button ID="btnShow" runat="server" Text="Play Video" OnClientClick="return ShowModalPopup()" />
   <asp:LinkButton ID="lnkDummy" runat="server"></asp:LinkButton>
   <cc1:ModalPopupExtender ID="ModalPopupExtender1" BehaviorID="mpe" runat="server"
      PopupControlID="pnlPopup" TargetControlID="lnkDummy" BackgroundCssClass="modalBackground"
      CancelControlID="btnClose">
   </cc1:ModalPopupExtender>
   <asp:Panel ID="pnlPopup" runat="server" CssClass="modalPopup" Style="display: none">
      <div class="header">
         Youtube Video
      </div>
      <div class="body">
         <iframe id="video" width="420" height="315" frameborder="0" allowfullscreen></iframe>
         <br />
         <br />
         <asp:Button ID="btnClose" runat="server" Text="Close" />
      </div>
   </asp:Panel>
   <script type="text/javascript">
      function ShowModalPopup() {
      
          var url = $get("<%=txtUrl.ClientID %>").value;
      
          url = url.split('v=')[1];
      
          $get("video").src = "//www.youtube.com/embed/" + url
      
          $find("mpe").show();
      
          return false;
      
      }
      
   </script>
</div>

Here you can see I have used Script for getting YouTube URL and show link in ModelPopup Extender.

<script type="text/javascript">
    function ShowModalPopup() {   
        var url = $get("<%=txtUrl.ClientID %>").value;   
        url = url.split('v=')[1];   
        $get("video").src = "//www.youtube.com/embed/" + url $find("mpe").show();
        return false;   
    }   
</script>

Now assign some Style for ModelPopupExtender for Layout in Webpage.

<style type="text/css">
   body
   {
   font-family: Arial;
   font-size: 10pt;
   }
   .modalBackground
   {
   background-color: Black;
   filter: alpha(opacity=60);
   opacity: 0.6;
   }
   .modalPopup
   {
   background-color: #FFFFFF;
   width: 500px;
   border: 3px solid #0DA9D0;
   padding: 0;
   }
   .modalPopup .header
   {
   background-color: #2FBDF1;
   height: 30px;
   color: White;
   line-height: 30px;
   text-align: center;
   font-weight: bold;
   }
   .modalPopup .body
   {
   min-height: 50px;
   padding: 5px;
   line-height: 30px;
   text-align: center;
   font-weight: bold;
   }
</style>

Now run your Application and Paste YouTube Video URL in Textbox and Click on button to open ModelPopupExtender with YouTube Video.

How to Use Ajax AutoCompleteExtender in Asp.Net


Description:-

In this article we will use auto complete extender to search record from database or else it will automatic display that records what you want to search from database. Here we will use Country Table to search Country Name from Database and from First Character it will search and after display records for same character. For auto complete extender we need to search record from database and return to extender.

Create Country table in your Sql Server and Fill Some Data for Search Records.

CREATE TABLE [dbo].[Country](
      [CountryID] [bigint] IDENTITY(1,1) NOT NULL,
      [CountryName] [varchar](50) NULL,
 CONSTRAINT [PK_Country] PRIMARY KEY CLUSTERED
(
      [CountryID] ASC
)WITH (PAD_INDEX  = OFF, STATISTICS_NORECOMPUTE  = OFF, IGNORE_DUP_KEY = OFF, ALLOW_ROW_LOCKS  = ON, ALLOW_PAGE_LOCKS  = ON) ON [PRIMARY]
) ON [PRIMARY]
GO

Design your Webpage like below with Ajax AutoCompleteExtender.

<div>
   <asp:ScriptManager ID="ScriptManager1" runat="server" EnablePageMethods="true">
   </asp:ScriptManager>
   <table style="margin-top: 40px; color: Black">
      <tr>
         <td>Search County</td>
         <td>
            <asp:TextBox ID="TextBox1" runat="server" Width="176px"></asp:TextBox>
            <asp:AutoCompleteExtender ID="AutoCompleteExtender2" runat="server" TargetControlID="TextBox1" FirstRowSelected="false" MinimumPrefixLength="1" CompletionInterval="10" EnableCaching="false" CompletionSetCount="1" ServiceMethod="GetCompletionList">
            </asp:AutoCompleteExtender>
         </td>
      </tr>
   </table>
</div>

Now Register AjaxControlToolKit in your Webpage like below.

<%@ Register Assembly="AjaxControlToolkit" Namespace="AjaxControlToolkit" TagPrefix="asp" %>

Step 3: Now Create Method in Code behind and Name it “GetCompletionList” because we already Assign this Method in AutoCompleteExtender Property.

[System.Web.Script.Services.ScriptMethod()]
[System.Web.Services.WebMethod]
public static List<string> GetCompletionList(string prefixText, int count)
{
  using (SqlConnection con = new SqlConnection())
  {
    con.ConnectionString = ConfigurationManager.ConnectionStrings["DBCS"].ConnectionString;
    using (SqlCommand com = new SqlCommand())
    {
      com.CommandText = "select CountryName from Country where " + "CountryName like @Search + '%'";
      com.Parameters.AddWithValue("@Search", prefixText);
      com.Connection = con;
      con.Open();
      List<string> countryNames = new List<string>();
      using (SqlDataReader sdr = com.ExecuteReader())
      {
        while (sdr.Read())
        {
          countryNames.Add(sdr["CountryName"].ToString());
        }
      }
      con.Close();
      return countryNames;
    }
  }
}

Now run your Webpage in Browser and Search Country Name from Textbox. There you can get Related Characters Country Name in AutoCompleteExtender.

How to Create AutoUpload File Using Jquery in Asp.Net


Description:-

In this Example we will Create Auto Upload file using JQuery in Dot net. Browse file and Upload Directly with Specify Folder. Here we will Create Script for Browse File and Upload Directly. Using Uplodify JQuery we can achieve this functionality.

Drag and Drop FileUpload Control in your Webpage.

<div style="padding: 40px">
  <asp:FileUpload ID="FileUpload1" runat="server" />
</div>

We will User JQuery in this Webpage is given below.

<script type="text/javascript" src="jquery-1.3.2.min.js"></script>
<script type="text/javascript" src="jquery.uploadify.js"></script>
Now Create Script for Auto Upload after Selecting File with Some Property like Auto Upload, Multi Select File, and Folder for Save Image, Image Extension for Validation, Files Description, and Button Text for Browse files etc...

<script type="text/javascript">
    $(window).load(
    function () {
        $("#<%=FileUpload1.ClientID %>").fileUpload({
            'uploader': 'scripts/uploader.swf',
            'cancelImg': 'images/cancel.png',
            'buttonText': 'Browse Files',
            'script': 'Upload.ashx',
            'folder': 'Files',
            'fileDesc': 'Image Files',
            'fileExt': '*.jpg;*.jpeg;*.gif;*.png',
            'multi': true,
            'auto': true
        });
    }
);
</script>

Now run your Application and Browser File it will Auto Upload your Selected File in your Selected Folder.
Insert items to database and display it within a dropdownlist after adding in asp.net

Insert items to database and display it within a dropdownlist after adding in asp.net

Description:-

In this blog we will know how to insert items to database and display it within a dropdown list after adding those items simultaneously.

Create Table:-

CREATE TABLE [dbo].[Food](
[Fid] [bigint] primary key IDENTITY(1,1)NOT NULL,
[Fname] [nvarchar](100)NULL,
[Fprice] [bigint] NULL,
[Recstatus] [char](1)NULL,
)
 
INSERT INTO Food(Fname,Fprice,Recstatus)VALUES('Dal',2000,'A')
INSERT INTO Food(Fname,Fprice,Recstatus)VALUES('Rice',52000,'A')
INSERT INTO Food(Fname,Fprice,Recstatus)VALUES('Tuwerdal',3000,'A')
INSERT INTO Food(Fname,Fprice,Recstatus)VALUES('Chanadal',5000,'A')

Default.aspx:-

<div>
  Name:<asp:TextBox ID="txt_name" runat="server"></asp:TextBox><br />
  Price:<asp:TextBox ID="txt_price" runat="server"></asp:TextBox><br />
  RecStatus:<asp:TextBox ID="txt_recstatus" runat="server"></asp:TextBox><br />
    <asp:RequiredFieldValidator ID="RequiredFieldValidator1" runat="server" ControlToValidate="txt_name"                 ErrorMessage="Please insert name"></asp:RequiredFieldValidator>
    <br />
    <asp:Button ID="btn_add" runat="server" Text="Add Name" OnClick="btn_add_Click" Width="100px" /><br />
    <asp:DropDownList ID="DropDownList1" runat="server">             </asp:DropDownList>
    <br />
</div>

Default.aspx.cs:-

string strConnString = ConfigurationManager.ConnectionStrings["DBCS"].ConnectionString;
string str;
SqlCommand com;
protected void Page_Load(object sender, EventArgs e)
{
  if (!IsPostBack)
  {
     dropbind();
  }
}

protected void btn_add_Click(object sender, EventArgs e)
{
  DropDownList1.Items.Clear();
  SqlConnection con = new SqlConnection(strConnString);
  com = new SqlCommand();
  com.Connection = con;
  com.CommandType = CommandType.Text;
  com.CommandText = "INSERT INTO Food(Fname,Fprice,Recstatus)VALUES(@Fname,@Fprice,@Recstatus)";
  com.Parameters.Clear();
  com.Parameters.AddWithValue("@Fname", txt_name.Text);
  com.Parameters.AddWithValue("@Fprice", txt_price.Text);
  com.Parameters.AddWithValue("@Recstatus", txt_recstatus.Text);
  if (con.State == ConnectionState.Closed)
    con.Open();
  com.ExecuteNonQuery();
  con.Close();
  Response.Write("Records successfully inserted");
  clear();
  dropbind();
}

private void clear()
{
  txt_name.Text = "";
}

private void dropbind()
{
  SqlConnection con = new SqlConnection(strConnString);
  DropDownList1.Items.Add("Choose Name");
  con.Open();
  str = "select * from Food";
  com = new SqlCommand(str, con);
  SqlDataReader reader = com.ExecuteReader();
  while (reader.Read())
  {
    DropDownList1.Items.Add(reader["Fname"].ToString());
  }
  reader.Close();
  con.Close();
}